
Managing In-App Purchases: Tips to Control Spending on iPhone or iPad

Managing iPhone app purchases is essential because most applications now include additional paid content or subscriptions.
While these offer extra functionality, Managing iPhone app purchases ensures that users—especially children—don’t accidentally spend money.
All of us are aware that applications have in-app purchases. But what does it actually mean? Well, they are extra content or subscriptions you buy inside an app that provides additional value or functionality. Frequently, app developers offer users the option to choose between utilizing the basic, no-cost features of the app or opting for enhanced features through payment.
For applications available on platforms such as the App Store for iOS or the Google Play Store for Android, the marketplace collects a portion of the revenue generated from in-app purchases. Further, these platforms clearly indicate whether an app contains in-app purchases through a badge displayed on the app store listing.
Have you ever wondered how companies manage to sustain free mobile applications? The key lies in in-app purchases. The expenditure of mobile app users on in-app purchases exceeds $380 billion, constituting around 48% of total mobile app revenue.
Let’s take a sneak peek into the in-app purchases statistics. In 2022, the Apple App Store hosted approximately 2.18 million apps and games. By 2023, the number decreased to 1.76 million apps, including 460,000 games. Among the total of 1,776,562 apps available on the platform, 217,978 are categorized as gaming apps, while the remaining 1,558,584 are classified as non-gaming apps.
Consumer spending on non-gaming apps increased by 10.6% in 2022 to $36.3 billion. Apple App Store consumer spending on games declined 4.3% in 2022. This was the store’s first annual decline.
Because of the enormous money potential from in-app purchases, developers often make their apps free to download at first. They focus on long-term value rather than making money upfront by charging for the app. Such a strategy can prove to be highly profitable in the long run.
Managing iPhone app purchases and how to disable them
To turn off the in-app purchases on the iPhone/iPad, you can use Apple Screen Time settings to prevent dispensable, unauthorized and unintentional purchases from the App Store.
Managing iPhone app purchases by accessing Screen Time
To enable Screen Time:
1. Go to Settings > Screen Time.
2. Tap Turn On Screen Time, then tap it again.
3. Select This is My [device] or This is My Child’s [device]. Learn more
Managing iPhone app purchases via Privacy Restrictions
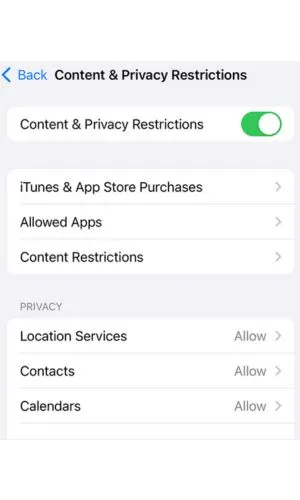
1. When Screen Time is enabled, go to Settings > Screen Time, then tap Content & Privacy Restrictions. If asked, enter your passcode, then turn on Content & Privacy Restrictions. You’ll only be asked to enter a passcode if you’ve already created one in Screen Time. Find out how to create a Screen Time passcode.
Managing iPhone app purchases by selecting Don’t Allow
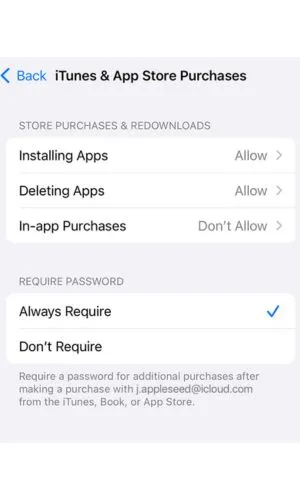
1. Tap iTunes & App Store Purchases.
2. Tap In-app Purchases and select Don’t Allow.
In addition to this, you can also enable password requirements for each purchase made on the App Store.
Managing iPhone app purchases with alternative methods
1. Enable password requirement for each purchase.
2. Turn off purchasing completely.
3. Enable Family Sharing for the child’s iTunes account and enable the ‘Ask to Buy‘ feature.
Managing iPhone app purchases and App Store subscriptions
Managing iPhone app purchases within App Store settings
Nowadays, most applications offer in-app purchases and subscriptions to unlock various aspects and features of their respective apps. Subscription-based apps operate on a model where users pay a regular fee to access special content and premium features. Typically, this fee is charged monthly or yearly, although weekly or quarterly options exist as well.
At the end of each subscription period, users have the option to cancel or adjust their subscriptions. But in some cases, subscriptions may renew automatically. Hence, it becomes necessary to manage the subscriptions.
There are two ways to view the subscriptions you have purchased:
– Via the App Store
– Via the iOS settings
Viewing and Managing subscriptions through the App Store:
Within the App Store app, you can manage subscriptions, review, and download purchases made by yourself or other family members. You can also set restrictions and tailor your preferences for the App Store through the Settings menu.
1. Go to the App Store, click on your profile picture at the top right

2. Tap on your Apple ID > Authenticate using your passcode or Face ID (You may need to sign in with your Apple ID in case you did not login to the App Store)
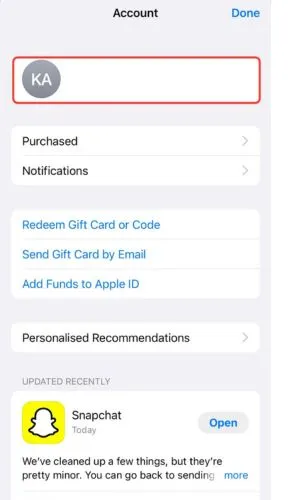
3. Tap on Subscriptions
4. Choose a subscription, then do any of the following:
- Change or cancel an existing subscription.
- Resubscribe to an expired subscription.
- Share an eligible App Store subscription with other family members in your Family Sharing group.
Viewing and Managing subscriptions through the Settings app:
You can also view and manage your subscriptions from the Settings menu.
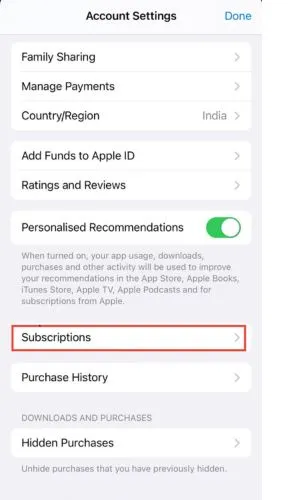
1. Visit the Settings App, click on your Name/Apple ID
2. Tap on Subscriptions
3. Choose a subscription, then do any of the following:
- Change or cancel an existing subscription.
- Resubscribe to an expired subscription.
- Share an eligible App Store subscription with other family members in your Family Sharing group.
Managing iPhone app purchases to change or cancel plans
To change an existing subscription, open the Settings app.
- Select your name and proceed to tap on Subscriptions.
- Choose the subscription you wish to modify.
- Tap on See All Plans, then follow the on-screen instructions to purchase.
To cancel an existing subscription, open the Settings app.
- Tap your name and then tap Subscriptions.
- Tap a subscription, then tap Cancel Subscription or Cancel All Services.
PS. You can perform the same via the App Store setting as well.
Managing iPhone app purchases to reactivate subscriptions
- Launch the Settings app, then tap on your name and Apple ID located at the top of the screen.
- Select “Subscriptions.” You might need to input your password or authenticate using Touch ID or Face ID to access your account.
- Scroll down to find the list of expired subscriptions. Choose the one you wish to reactivate.
- Once on the subscription page, select your preferred subscription option, then confirm your selection. You’re now successfully resubscribed.
Managing iPhone app purchases using Family Sharing
Subscriptions can now be shared among family members as well. When you share subscriptions, everyone sees their own preferences and recommendations, not the whole family’s.
To share the subscriptions, family sharing must be enabled on the accounts of the family members using it.
1. Open the Settings app.
2. Tap your name, then tap Family Sharing.
3. Tap “Set Up Your Family,” then follow the instructions displayed on the screen to invite your family members.
4. For those who have already set up Family Sharing on their iPhone or iPad, navigate to Settings and tap on your name.
- Select “Subscriptions.”
- Ensure that “Share with Family” is enabled by scrolling down.
- Choose the subscription you wish to share.
- If the subscription is individual or student, upgrade it to a family plan.
- Note that non-Apple subscriptions may not be eligible for sharing. Enable “Share with Family” to share a subscription under Family Access.
5. Eligible subscriptions are shared with your family members automatically.
Pros and Cons of App Store subscriptions
Pros:
– Subscription-based apps generate greater revenue
– They also engage more audience
Cons:
– There is a constant need to provide new features and content to keep the audience engaged
– Onboarding and a Free trial period is required to give an idea of the Premium features the applications offer.
– Subscription apps need to have a strong Support team to assist users with their concerns.
Ways to keep track of and manage App Store subscriptions
As mentioned above, there are two ways to track and manage the subscriptions you have purchased:
– Through the App Store settings
– Through the iOS settings
How to monitor and limit in-app spending on iPhone or iPad
Access Screen Time reports
Using the Screen Time feature, one can easily access and view the real-time reports that give an insight into time spent on the devices. In addition to the weekly reports, you can also set schedules to have some time away from the screen and even set daily time limits for the app categories you wish to manage. Learn more
Set app limits
You have the option to establish time restrictions for a group of apps (such as Games or Social Networking) as well as for individual apps. Here’s how:
- Navigate to Settings > Screen Time.
- Tap on “App Limits,” then select “Add Limit.”
- Choose one or more app categories.
- If you wish to set limits for individual apps, tap on the category name to view all the apps within that category. Then, select the apps you wish to limit. Keep in mind that if you choose multiple categories or apps, the time restrictions you set will apply to all of them.
- Tap “Next” at the top right corner, then specify the time allowed.
- To set a daily limit, tap on “Customize Days” and set limits for specific days.
- Once you’ve finished setting the limits, tap on “Add.”
Customize Downtime
Downtime lets you set a time of day when your device reminds you that it’s time to unplug and do something else. When Downtime is activated on your iPhone, you have the option to receive calls only from contacts you’ve allowed for communication during Downtime. Also, you can access apps that you’ve chosen to be available at all times. Once you’ve set up Downtime, you’ll receive a reminder five minutes before Downtime begins. You’ll then be notified when Downtime begins.
1. Go to Settings > Screen Time.
2. Tap App & Website Activity, then turn on App & Website Activity if you haven’t already.
3. Tap Downtime, then do one of the following:
- Tap Turn On Downtime Until Tomorrow.
- Tap Scheduled to schedule Downtime in advance.
4. When you set up Downtime, a reminder is sent 5 minutes before it begins. You have the option to dismiss the reminder or activate Downtime until the scheduled period starts.
5. Choose between “Every Day” or “Customize Days,” then specify the start and end times. You can disable the Downtime schedule at any point by toggling off the “Scheduled” option.
Pros and Cons of monitoring, limiting and turning off in-app purchases
Pros:
– It prevents dispensable, unauthorized and unintentional purchases from the App Store or Apple services.
– One major concern is the issue of addiction, particularly among vulnerable users such as children, which can be controlled by monitoring, limiting or disabling the in-app purchases.
– Parents can easily monitor and track the app usage and subscriptions purchased.
– It can also be used to enlighten and encourage the kids to spend their money wisely.
Cons:
– Once the in-app purchase limits are set, entering the Parent/Guardian credentials to proceed with the purchase might be required, which can sometimes be tedious.
How can Mobicip help?
With most kids having their own mobile/computer devices, it becomes necessary to ensure they have a pleasant experience on the internet. This is where parental control software comes into play. Parental control applications like Mobicip provide features like app blocking, content filtering, time limits, activity tracking, and many others.
With Mobicip, monitoring online behaviour, establishing daily time limits, and blocking objectionable content is possible. Mobicip is an easy-to-use interface that lets you adjust settings according to your child’s age and maturity.
Try our free trial and see how Mobicip can be your guide to keep your child safe and balanced online. Head to Mobicip now and kickstart this exciting chapter in your child’s digital well-being!